
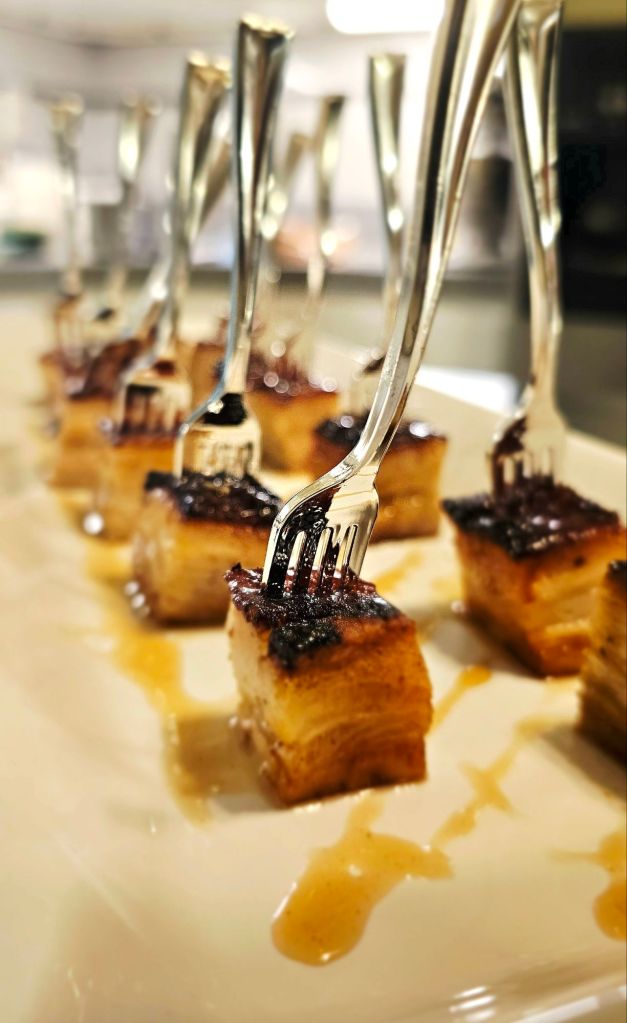
Crispy Pork Belly with Maple Glaze
Intro — why baking soda & drying the skin:
To achieve the signature crackling on pork belly you want the skin to be as dry as possible and its surface chemistry optimized for browning. Drying the skin (air-drying uncovered in the fridge overnight) removes surface moisture so the skin can blister and crisp instead of steaming. A very light sprinkle of baking soda (sodium bicarbonate) raises the surface pH and helps the Maillard reactions proceed more efficiently, promoting a drier, crisper finish. Use baking soda sparingly — too much can leave an off taste. The combination of thorough drying, controlled low-and-slow roasting to render fat, then a high blast or broil to blister the skin yields a perfectly crisp crackle with silky, tender meat underneath.
Ingredients
Pork Belly & Drying Rub
- 3–4 lb (1.5–1.8 kg) pork belly, skin on, bone removed
- 2 tsp kosher salt (for seasoning meat)
- 1½ tsp fine sea salt (to rub into skin)
- ½ tsp baking soda (very important: measured)
- 1 tbsp neutral oil (grapeseed or canola) — to help rub adhere
- Freshly ground black pepper, to taste
Maple Glaze
- 1 cup pure maple syrup (Grade A or darker for more flavor)
- 2 tbsp soy sauce or tamari (use tamari for gluten-free)
- 1 tbsp apple cider vinegar or fresh orange juice
- 1 tsp Dijon mustard
- 1–2 tsp finely grated ginger (optional — brightens)
- 1 tbsp unsalted butter (optional) or 1 tbsp neutral oil for dairy-free finish
- Pinch of flaky sea salt and a few grinds of black pepper
Equipment
- Roasting pan with rack
- Sharp knife for scoring (if needed)
- Baking sheet and wire rack for fridge drying
- Saucepan for glaze
- Thermometer (instant read)
Method
1 — Prep the pork
- Pat pork belly skin and meat dry with paper towels. If the skin still has hair or uneven bits, remove with a sharp knife and clean thoroughly.
- Score the skin if not already scored: use a very sharp knife and make shallow parallel cuts about ½ inch (1–1.5 cm) apart — do not cut into the meat (only through skin/soft fat). Alternatively leave unscored and rely on blistering from high heat.
- Season the meat side with kosher salt and black pepper. Rub the meat side with 1 tsp oil.
- On the skin side: combine the fine sea salt and baking soda; sprinkle evenly over the skin and rub lightly with the remaining oil so the salt/baking soda mix adheres. (Use the ½ tsp baking soda total — do not exceed.)
2 — Dry the skin (overnight recommended)
- Place the pork belly skin-side up on a wire rack set over a baking sheet. Refrigerate uncovered overnight (8–14 hours). This dries the skin and firms the surface for crisping.
- If short on time: pat the skin very dry and use a fan to blow air on it for 1–2 hours — not as effective as overnight but helpful.
3 — Low & slow roast to render fat
- Remove pork 30–45 minutes before roasting to come toward room temperature. Preheat oven to 275°F (135°C).
- Place pork belly skin-side up on a rack in a roasting pan. Roast for 2 to 2½ hours — the goal is to render connective tissue and fat while keeping the skin from blistering yet.
- Check internal temperature: target about 150–155°F (65–68°C) at this stage for later finishing (the meat will rise slightly while resting).
4 — Finish hot to crisp the skin
- Increase oven temperature to 500°F (260°C) or set to broil (top element only). If using broiler, position the rack 8–10″ from heat source.
- Roast/broil for 6–12 minutes, watching very closely — the skin should puff, blister and become golden to deep amber. Rotate pan if needed for even blistering. Do not leave unattended — it can go from perfect to burnt quickly.
- Remove when skin is crackled and crisp; tent loosely with foil and rest 10 minutes. (The resting keeps juices distributed.)
5 — Make the maple glaze & finish
- While pork rests, make the glaze: in a small saucepan over medium heat combine maple syrup, soy/tamari, apple cider vinegar (or orange juice), Dijon, and ginger. Bring to a gentle simmer and reduce until slightly syrupy (4–6 minutes).
- Off heat whisk in butter (or oil) to give shine and mouthfeel. Season to taste with a pinch of salt and a crack of black pepper.
- Brush a thin layer of glaze over the crispy skin just before slicing — this will caramelize lightly and add gloss. If you prefer the glaze under the crackle, brush on the meat side instead for a cleaner surface on the crackle.
To Slice & Serve
- Slice into neat portions using a very sharp knife (thin sawing motion). For restaurant style, cut ¾–1″ thick portions.
- Miso-Maple glaze: whisk 1 tsp white miso into the glaze for extra umami (add to saucepan while reducing).
- Dairy-free finish: swap butter for a tablespoon neutral oil to finish the glaze.
- Pairing: serve with roasted apples, braised fennel, or a small salad of shaved Brussels sprouts, chestnuts, and pomegranate for autumn accents.
Chef Notes & Troubleshooting
If skin doesn’t puff: Ensure it was very dry and that you reached a very high finishing temperature (broil or 500°F). You can also try briefly torching with a kitchen blowtorch to blister localized areas.
For an ultra-crispy crackle: after the high blast, place the pork under a towel for 5 minutes to let residual steam redistribute — this can help the crackle firm and separate cleanly from fat.
Variations & Pairing
Service tip: For plated service, slice and finish with glaze tableside to preserve maximum crackle and aroma. A final grate of lemon zest over the meat brightens the fat and maple notes.


Leave a comment